Installation Education


Getting Started


Installation Videos

SPC Egress Installation Preparation St Paul Corrugating Egress Window Well Installation

  • Egress Code Requirements

    egress window well

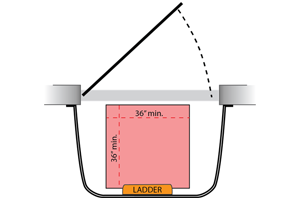
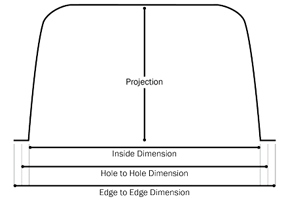
    A “means of egress” is simply a basement window that provides an additional way out in case of emergency. Window opening must be a minimum 5.7 sq. ft. and the egress well space must be a minimum 9 sq. ft. Add a LifeStep™ or Corner Step™ egress ladder if the window-well is 44” deep (or more).

    What is Egress? (PDF)

  • Installation Location

    egress window well

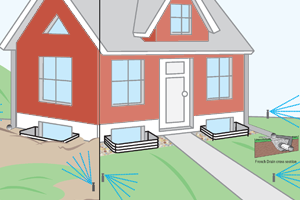
    For a successful egress installation, the foundation location needs to be assessed. It is important to check if there is a need to move or relocate amenities.

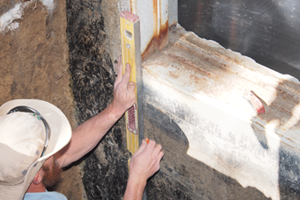
    The foundation wall needs to be in good condition and it is recommended that well placement is at least 3 feet from the foundation corner to maintain structural stability.

    Call your local utility provider for location services prior to digging.

  • Control the Flow of Water

    egress window well

    Plan for a Succesful Installation

    • Window well should extend a minimum of 2” above the established grade line
    • Position the well to allow sufficient drainage away from the foundation with your desired finished grade level.
    • All water must be directed away from the well to assure proper drainage.
    • Direct gutters, down spouts and sprinkler heads away from the window well.

Installation Best Practices

  • Site Preperation

    egress window well

    • Protect your surrounding area by laying down plywood and tarps for temporary soil placement.
    • Only disturb the ground soil necessary for the installation to avoid soil movement post installation.
    • When possible, dig the hole by hand, depending on the depth of the well, and soil conditions.
    • The hole for your egress installation needs to be at least 12” larger than the window well, all the way around. Allowing room for installation.

    Window Well Installation Guide (PDF)

  • Well Installation Prep

    egress window well

    • Mark foundation for mounting the window well, noting the appropriate width of the well. Making sure that the well will be mounted a minimum of 2” above the established grade.
    • Mark the area where the top of the window well will be mounted.
    • Draw two vertical lines for drilling mounting anchors. This will ensure that the well is mounted to the correct width as specified by the manufacturer.
    • Drill two top holes in which to mount the well. Use concrete masonry sleeve or wedge type anchors (minimum 3/8” x 2”), along with washers.

    SPC Egress Well Dimensions (PDF)

  • Well Mounting and Backfill

    Well Instalation

    • Then align the window well to your markings and drill, then secure the well with anchors, at a minimum of every 10” center in the flange mounting holes.
    • Connect window well drain into the foundation drainage system.
    • Place fill evenly around the window well in 12” layers using non-mechanical compaction to ensure window well profile does not become distorted.
    • Add washed stone in the base of the window well for drainage and structural support.
    • Sculpt ground grading so that water easily runs away from the house and well.
  • Foundation Preparation

    Window cutting prep

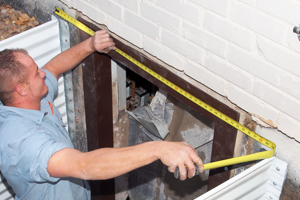
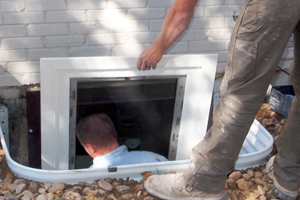
    Installing basement egress windows requires a large hole to be cut into the home's foundation. Ensuring you have the necessary equipment is a must.

    For creating your egress opening, it is suggested that you hire a foundation cutting professional. A foundation specialist can assess the integrity of the foundation, which is critical when cutting the opening for the window in the foundation.

    • Cutting through the foundation requires a water cooled hydraulic concrete saw.
    • Start by cutting the bottom section and then each side
    • Avoid over cutting corners. Overcuts can lead to issues with waterproofing and structural integrity.
    • The masonry opening should be as smooth and square as possible before you fasten the window framing lumber to the masonry with construction adhesive and masonry fasteners
  • Window Installation

    Window installation

    SPC Tilt N Turn windows are secured to the framed opening by anchor straps (provided). An alternative installation method (less preferred) is to install the window by screws through the vinyl and first wall of steel.

    • Frame out opening with framing boards with pressure treated lumber. The sides of the framed opening should be plumb; the sill and header should be level.
    • Cut and bend a piece of flashing. Apply sealant across the framing and edge of sheathing at the top and along the ends. Fasten the flashing to the top, wetting out the sealant.
    • Insert plastic shims between framing and masonry to get your rough opening done right. Take care to prevent water intrusion by thoroughly caulking the joint between window and masonry.
    • Place sealant under each anchor clip before driving a screw through the anchor strap.
    • Check the window for smooth operation and any necessary adjustments.

    Tilt N Turn Window Installation Guide (PDF)

  • Finishing

    Window installation

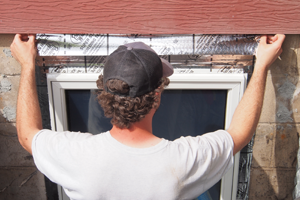
    When finishing the exterior of your window installation, prevention of water or moisture intrusion is critical.

    • Once the window is level and secured, use a low-pressure polyurethane window and door insulating foam sealant to create an interior seal around all 4 sides of the window.
    • Insert backer rod to exterior gap between window and framing.
    • Then tape the window header by extending beyond the horizontal strips by 1" on each side.
    • After the placement of siding or trim, apply a continuous bead of sealant around the window. Shape and clean any excess sealant.

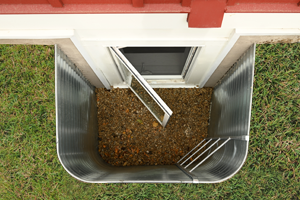
    Finish your installation by installing an SPC egress ladder and Safe-T-View Cover™.

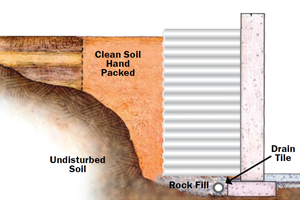
    Sculpt soil and landscape around the egress well to ensure proper water drainage away from the house.


Find Our Products

Want to buy a SPC product? Our product line is available through your preferred local building material dealer.


WHO WE ARE

St. Paul Corrugating Company, the originator of steel areawalls, manufactures under the Lux-Right™ brand name the most complete line of areawalls (window wells) and accessories used for basement egress available from any one source. Since 1885 our name has been associated with innovation in metalwork.

GET IN TOUCH

St. Paul Corrugating Company
700 39th Ave NE
Columbia Hgts. MN 55421, US
P:1-800-439-9271

MADE IN AMERICA

SPC products are proudly manufactured in Columbia Heights, Minnesota and has been providing architectural solutions for over 130 years.

Made in America